Key Talking Points:
- False Breaks Offer Great With Trend Trade Setups
- Trading the False Break with Pin Bars
- Trading the False Break with Engulfing Bars
In my prior article on trading the false break strategy part 1, I shared the basic definition of a false break, covered what is the price action and order flow behind false breaks, and how we can trade them.
In this false break forex trade strategy article, I will discuss how you can trade them using pin bars and engulfing bars, along with entry, SL and TP techniques.
To Recap What A False Break Is
I generally define a false break as one of the two following scenarios:
- A break above/below a prior candle that fails to close above/below that candle
- A break above/below a key level, quickly reversing that level, and sparking a counter-trend move
Below is another example of a false break:
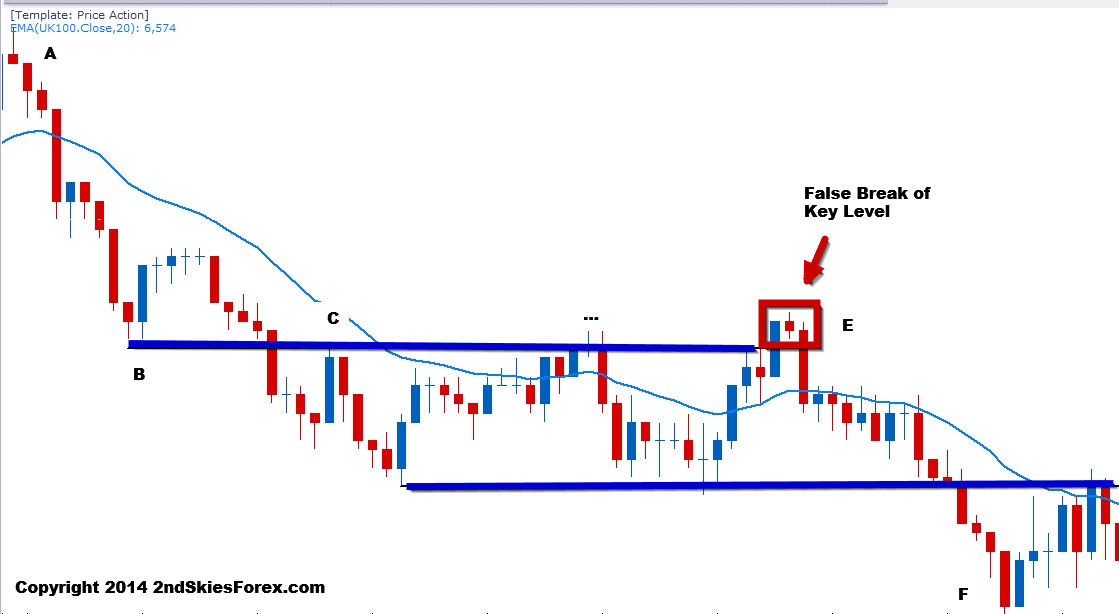
Looking at the chart above, we can see a clear downtrend, starting with A in the top left of the chart. The sell-off finds support at B, which eventually becomes a role reversal level at C.
Further along at E, we can see the textbook false break setup, just like we defined in the prior article. The pair breaks up above the key level CT (counter-trend), stalls, then sells off again breaking back below, and offering a great false break setup.
This sell off heads all the way down to F for a nicely profitable trade, and is a great example of a false break setup.
Now we will discuss how to trade the false break setup with a pin bar.
The Pin Bar + False Break Setup
Another type of false break setup is using the pin bar reversal pattern. In many ways, the pin bar by itself, can be a type of ‘false break’.
This is true if the body of the pin bar itself is housed within the prior bar. The breaking above/below the prior bar, and then closing back within that bar, is in and of itself, a type of false break.
What we are going to discuss is how we can use this to trade the false break strategy in combination with the pin bar.
A Pin Bar + False Break Example

In this chart above, we can see at A (top left), there is a bullish move to the dynamic resistance (20 EMA). The sell off from the dynamic resistance to B only takes 3 bars, which means it was over 2.5x faster then the buying pressure at A.
From an order flow perspective, the sellers are stronger, since it took them less time to cover the same distance.
After breaking below the support level at B, the pair bounces at D’ towards C, (very same support level at A), hence a role reversal level.
Now notice at C how the pair briefly broke above A. If the buyers were really in control, they would have kept pushing prices. But the pin bar formed a false break above the highs of the blue bar (or prior bar).
This breaking above then back below, suggested a likely false break and more selling. The pair sold off from C to D, re-affirming the pin bar + false break setup.
NOTE: Observe how the support level at D and D’ formed another role reversal setup just after? This is a great example of trading with the trend.
Entry, Stop & Limit
If the pin bar represents a real false break, then the with trend direction should continue. Assuming I have read the price action context correctly, I generally like to enter using one of two methods:
- On a few pip break back below/above the key level
- On a pullback setup to the key level
The first entry method (more aggressive), can protect you from missing the move, as sometimes the false break never offers a second chance to enter.
For those wanting more ‘confirmation’, then I’d recommend the second entry method.
Now assuming the pin bar is the high/low in the move, I’ll put my stop just above/below the pin bar. For my take profit, if there is a prior level which caused the bounce/sell-off leading into the pin bar, then I’ll target that. One can use that as the only target, or as a first TP holding for a deeper move.
Trading the Engulfing Bar + False Break Setup
In reality, the engulfing bar + false break setup is not much different from the pin bar false break. I am still wanting to trade them with trend as much as possible, looking for a false break followed by an engulfing bar.
An Engulfing Bar + False Break Example

Turning to the chart above, we can see the strong selling stops at A. This forms a price action squeeze, which leads to a breakout and further selling.
The pair pulls back to B (the support level at A), and forms a false break. This is immediately followed by an engulfing bar.
Now ask yourself, if the bulls were truly in control, why did the price action immediately reverse after taking out A? This should have been a clue to watch for a false break.
You’ll notice right after the engulfing bar was an inverted pin bar. This is a failed attempt to rally, suggesting the buyers tried to push higher, but failed. What results is heavy selling from the open of the next bar down to C, and eventually E, resulting in a nice profit.
NOTE: Take a look at the move from C – D. This is a corrective pullback following an impulsive move. The corrective pullback went into the dynamic resistance (2o EMA), and then sold off heavily after.
This would have represented a great pullback setup, and is a good example of how impulsive and corrective moves manifest.

Entry, SL & TP
The entry, stop loss and take profit techniques are the same as the pin bar + false break. The only variation, would be if the engulfing bar closes back below/above the key level.
If it does, I’ll look to take a pullback into the engulfing bar, which is far more optimal entry as a whole. For more information on why the pullback is a more optimal entry for the engulfing bar, click here.
To Recap
In today’s false break forex trade strategy article, I talked about how false breaks offer great with trend setups. I then went into two more examples of the false break strategy, showing how you can trade them with pin bars and engulfing bars.
I shared entry, SL and TP techniques, along with explaining the price action and order flow behind these great setups.
These are just a few of the false break techniques available. If you want to learn more about trading the false break, along with other forex trading strategies, you can read more about my Price Action Course & Daily Members Commentary here.

Great Information Sir! Thanks a lot
De nada PA Learner. Glad you are finding it informative.
Thanks for sharing! Very enlightening!
Hello Chris,
I’m going thru your articles focusing on Breakout and False Breakout trading to understand this strategy from inside out.
Regarding the 2nd trade Engulfing bar, you mentioned trade with trend,
so Is that top-left Impulsive Counter move followed by Pbar on the top?
Cheers.
Fantastic Article!
Hi Chris Capre
Thanks for your great articles as usual .
Hello Arman,
Glad you liked them.
Kind Regards,
Chris Capre
Once again another great article. Thank you Chris.
Hola Amigo,
Thanks mate – glad to hear you liked the article.
Kind Regards,
Chris Capre
Hi Chris,
Just a clarification. For the engulfing bar, do we take a pullback if it closes below or above the role reversal level?
Good question Bu Fan – ask this in the course and I’ll answer it there.
Kind Regards,
Chris Capre
Great Chris! Complete and absolutely clear. With a reasonable time spent testing it; will get anyone into greener days quickly. Thank you Chris. One of my favourites two-part articles from you.
Hola Pablo,
Am glad you liked it and found it clear. Yes, this is definitely a strategy you can profit from consistently once you learn it well.
Kind Regards,
Chris Capre